
Project Ares: Part V - RAID and data drives
Sharing the experience of building a home NAS/VM server.
The part 5 completes the system installation with setting up the system drives RAID-1 and the data drives in RAID-5 configuration over encrypted drives.
1. Introduction
In the previous part the Ubuntu system was installed on top of ZFS file system.
Now we will complete the system disks setup for RAID-1 redundancy configuration and the data drives with RAID-5 setup.
I eventually decided to setup my disks using the native ZFS encryption and RAID, after performing some comparisons and measurements.
This is the old version of the article, the new version using the native ZFS is now available here:
Project Ares: Part V - RAID and data drives
2. Setting up the system disk RAID-1
In this section we’ll setup the mirroring (RAID-1) of the system disk.
This can be eventually skipped if you only want a single primary drive without mirroring.
The advantage of setting this up is that the system will boot up even in case the primary drive fails (from the secondary drive mirror). The disadvantage is that you’ll need to spend another drive at least the same or bigger size of the primary drive (if bigger, can use the rest for some additional data partition that is not being backed up).
What will be done here:
- copying the EFI/GPT partition
- adding mirrors of the boot and root ZFS volumes (with the root still encrypted)
- adding mirror of the swap partition for hibernation setup (optional)
2.1. Preparing the environment
a) Connect remotely over SSH:
-
as the SSH server should be running, you should be able to connect remotely via the SSH client (eg. PuTTY on Windows)
-
use the hostname, username and password you’ve set up when installing the system
b) Enter the administrative console:
- this is for convenience to not have to type
"sudo"in front of every command
sudo -i
c) Set the variables for the disks being used:
- DISK[1]: The primary drive
- DISK[2]: The secondary drive
- use your disk ids as appropriate
# prefer to use the disk-by-path to avoid confusion with the disk assignment
ls -al /dev/disk/by-id/

# set the disk ids appropriately
# (use the physical disk links without the "-partN")

# the primary drive
DISK[1]=/dev/disk/by-id/<tab-complete-the-disk-path>
# the secondary drive
DISK[2]=/dev/disk/by-id/<tab-complete-the-disk-path>
2.2. Partitioning the secondary drive
-
here we should create the exact same partitions as on the primary drive
-
using similar commands that were used for the primary drive (change to your setup if necessary)
# list the existing partitions on the primary disk
sgdisk -p ${DISK[2]}
# !!! double check it is the correct drive you want to use !!!
# (otherwise change the DISK[2] variable appropriately)

# remove any existing partitions
# (note that if there are any LVM volumes currently active,
#  they should be removed first)
wipefs --all ${DISK[2]}

# clone the partitions of the primary drive
sgdisk -R ${DISK[2]} ${DISK[1]}

# set a new random disk GUID of the secondary drive
sgdisk -G ${DISK[2]}

# check by listing the partitions
sgdisk -p ${DISK[2]}
# compare with the primary drive
sgdisk -p ${DISK[1]}
2.3. Copying the EFI / GPT partition and install the boot loader
- note that the EFI / GTP partition will not be mirrored, just copied over
- it is eventually possible to mirror the EFI partition, however it is tedious to setup and might still have compatibility issues
- in addition the EFI partition rarely changes (once the system is installed it will never change again, at least not for Ubuntu - in CentOS the situation might be different because it contains the GRUB menu there which might eventually change more frequently)
- so we’ll save the hassle and just copy the partition over for now
a) Copy the EFI / GPT partition:
dd if=${DISK[1]}-part1 of=${DISK[2]}-part1 bs=1M
b) Install the GRUB boot loader:
- for UEFI Bios:
# mount the secondary EFI
mkdir -p /boot/efi2
mount ${DISK[2]}-part1 /boot/efi2

# install the EFI
grub-install --target=x86_64-efi --efi-directory=/boot/efi2 \
    --bootloader-id=ubuntu --recheck --no-floppy

# check the grub config has been created on the EFI
less /boot/efi2/EFI/ubuntu/grub.cfg

# check the EFI entries
efibootmgr -v

# eventually add a nicer Ubuntu entry
efibootmgr --create --disk ${DISK[2]}-part1 --loader '\EFI\UBUNTU\SHIMX64.EFI' --label "Ubuntu Linux (Backup)"

# eventually delete the other unwanted entries
# !!! make sure to keep the primary and secondary entry !!!
efibootmgr -Bb nnnn
- non-UEFI Bios:
# install the grub
grub-install --target=i386-pc ${DISK[2]}
2.4. Adding the Boot pool mirror
- adding the boot partition mirror:
# check the current array status
mdadm --detail /dev/md1

# attach the secondary disk partition
mdadm /dev/md1 --add ${DISK[2]}-part2

# check the array status to verify
# - should see both attached
mdadm --detail /dev/md1
2.5. Adding the Root pool mirror
- adding the root partition mirror:
# check the current array status
mdadm --detail /dev/md2


# attach the secondary disk partition
mdadm /dev/md2 --add ${DISK[2]}-part3

# check the array status to verify
# - should see both attached
mdadm --detail /dev/md2
2.6. Setting up the SWAP file
- the swap file also needs to be mirrored if we want to be able to run from either of the drives (otherwise the swap file would not be found and the boot loading will fail)
- this in particular is necessary if the hibernation is used
- if no hibernation is used, it might also be possible the ignore the swap partition mount error by using the “nofail” fstab/crypttab flags
- we will use mdadm as the mirroring option here
- we will re-do the complete swap setup now
- some early guides recommended putting the swap onto ZFS (ZVOL), however that is currently not recommended as it might create eventual deadlocks 1
- for non-ZFS setup the Ubuntu recommends using a swap file instead of the swap partition now, but that is not recommended either when using the ZFS (for the same reason as above)
a) The swap partition and RAID setup:
# unmount the current swap
swapoff -a

# create the swap MD array
mdadm --create /dev/md3 -l 1 -n 2 -e 1.2 ${DISK[1]}-part4 ${DISK[2]}-part4
# check the array status
mdadm --detail /dev/md3
b) The swap encryption setup:
- the “standard” non-hibernation encrypted swap setup is usually done via the “/dev/urandom” for generating the one-time encryption key
- this doesn’t work properly with ZFS root (even without hibernation!), because it creates a module load cycle during the bootup, resulting in some ZFS pools not being mounted randomly
(depending where the cycle is broken by the boot loader) - in the principle this is caused by the cryptsetup needing the root partition (for “/dev/urandom”) but the ZFS target to mount the root partition requiring cryptsetup, creating the cyclic dependency
- therefore we use an explicit generated encryption key that is used for the swap encryption
- for the hibernation to work the swap encryption key is added to the initramfs
(using the root partition key) - if you don’t plan to use the hibernation, the encryption key can be loaded from the root directly (without putting it to the initramfs)
# setup the swap partition encryption
cryptsetup luksFormat -q -c aes-xts-plain64 -s 512 -h sha256 \
    -d /etc/crypt/init/root.key /dev/md3
cryptsetup luksOpen -d /etc/crypt/init/root.key /dev/md3 swap

# make the swap filesystem
mkswap /dev/mapper/swap

# add the crypttab entry
# (using "discard" to allow SSD TRIM commands)
echo "swap /dev/md3 /etc/crypt/init/root.key luks,discard,initramfs" \
    >> /etc/crypttab
c) Finalizing the swap partition setup:
# add the encrypted swap entry to the fstab
echo "/dev/mapper/swap none swap sw,discard 0 0" \
    >> /etc/fstab

# remove the original swap entry in crypttab if any
vim /etc/crypttab
vim /etc/fstab

# re-enable the swap
swapon -a

# check the status
swapon --summary
d) Enabling the hibernation:
- this is optional - the hibernation can be enabled so that the system can wake up where it was stopped
# add the resume option
echo "RESUME=/dev/mapper/swap" > /etc/initramfs-tools/conf.d/resume
2.7. Fixing the degraded array bootup
There are currently some bugs in Ubuntu which prevent booting from degraded arrays. To fix, the following initramfs file needs to be created (see here for details):
cat <<EOF > /etc/initramfs-tools/scripts/local-top/md-boot
#!/bin/sh
PREREQ="mdadm"
prereqs()
{
    echo "\$PREREQ"
}
case \$1 in
prereqs)
    prereqs
    exit 0
    ;;
esac

mdadm --run /dev/md1
mdadm --run /dev/md2
mdadm --run /dev/md3
EOF

chmod +x /etc/initramfs-tools/scripts/local-top/md-boot
2.8. Updating the initram to contain all LUKS key entries
# re-create the initramfs image
update-initramfs -c -k all
# ignore the eventual cryptsetup warnings - should still work

# check if the cryptkeys still present in the initramfs
lsinitramfs -l /boot/initrd.img-<tab-complete-the-img-path> | less
# check for:
# - the "cryptroot/crypttab" size
# - the "cryptroot/keyfiles/zroot.key" file
# - the "cryptroot/keyfiles/swap.key" file
3. Testing the system disk setup
3.1. Testing the hibernation
- checking the hibernation support:
# install the power management utils
apt install -y pm-utils

# check the hibernation / suspend support:
# pm-is-supported [{--suspend | --hibernate | --suspend-hybrid}]
for state in suspend hibernate suspend-hybrid ; do
    pm-is-supported --$state && echo "$state: supported" || echo "$state: not supported"
done
- performing the hibernation:
# test the hibernation
systemctl hibernate
# or
pm-hibernate

# start the PC again after the hibernation
# and check the state restored
In particular, the “suspend-hybrid” state is especially interesting:
- it allows enter the sleep mode but the state is saved to the disk (hibernated) at the same time
- that means the wake up is fast in the usual case (waking up just from sleep mode)
- but if the power is lost, the state can still be restored from disk
The following table shows the differences between the power saving modes:
| Mode | To RAM | To HDD | Suspend | Restore | Consumption | Survives power down |
|---|---|---|---|---|---|---|
| Suspend | Yes | No | Very fast | Very fast | Low | No |
| Hibernate | No | Yes | Fast | Fast | Very low | Yes |
| Hybrid | Yes | Yes | Fast | Very fast | Low | Yes |
3.2. Testing the redundancy
Optionally (but strongly recommended) you can test if the system boots up in case one if the mirrored system drives fails:
- Shut down the machine (e.g. by using
"init 0") - Physically disconnect one of the drives
- Try to turn the machine on, to see if it boots up without any issues
- Connect the drive back and boot again
- Repeat for the other drive
Check the status of the ZFS pools and MD-RAID, you should see results like:
mdadm --detail /dev/md1
/dev/md1:
           Version : 1.2
     Creation Time : Sun Aug 30 17:41:16 2020
        Raid Level : raid1
        Array Size : 2095856 (2.00 GiB 2.14 GB)
     Used Dev Size : 2095856 (2.00 GiB 2.14 GB)
      Raid Devices : 2
     Total Devices : 1
       Persistence : Superblock is persistent

       Update Time : Fri Sep 18 22:41:03 2020
             State : clean, degraded
    Active Devices : 1
   Working Devices : 1
    Failed Devices : 0
     Spare Devices : 0

Consistency Policy : resync

              Name : ubuntu-test:1  (local to host ubuntu-test)
              UUID : e7eec08c:dd48273c:d753a245:07b201ea
            Events : 111

    Number   Major   Minor   RaidDevice State
       0       8        4        0      active sync   /dev/sda2
       -       0        0        1      removed
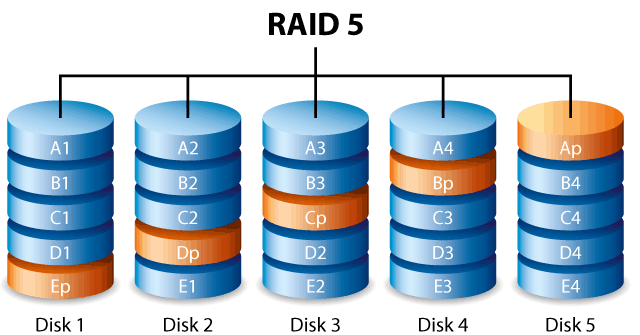
4. Setting up the RAID-5 data disks
This section explains the RAID-5 data disks setup.
The particular setup is as described in the Part 3 (OS and filesystem):
- mdraid RAID-5 array
- encryption layer (I’ll show the use of TrueCrypt / VeraCrypt, although LUKS can eventually be used as well)
- ZFS on top of the encryption layer
To recap, there are 2 main reasons to not use the native ZFS encryption and raid:
- Cannot expand existing RAID-5/6 (cannot add disks, needs to create a new RAID VDEV group instead) 2
- Reportedly poor performance of the native ZFS encryption 3
The disadvantages of this solution:
- the ZFS RAID would be able the synchronize on the filesystem level (knows which data are valid) thus much faster resyncing (mdraid needs to sync the whole block device as it doesn’t have the knowledge which data are valid)
4.1. Preparing the environment
- DISK[1] - DISK[4]: The disks to be used for the array
- use your disk ids as appropriate
# prefer to use the disk-by-path to avoid confusion with the disk assignment
ls -al /dev/disk/by-id/

# set the disk ids appropriately
# (use the physical disk links without the "-partN" if any)

DISK[1]=/dev/disk/by-id/<tab-complete-the-disk-path>
DISK[2]=/dev/disk/by-id/<tab-complete-the-disk-path>
DISK[3]=/dev/disk/by-id/<tab-complete-the-disk-path>
DISK[4]=/dev/disk/by-id/<tab-complete-the-disk-path>
4.2. Creating the partitions
- we will create a single partition covering the entire disk for each of the RAID disks
- the disk partition will then be used to create the array
# show the current partitions on each disk
# !!! double-check that they are the correct ones !!!
# (will destroy all existing data)
# - check the IDs, disk sizes, existing partitions etc.
sgdisk -p ${DISK[1]}
sgdisk -p ${DISK[2]}
sgdisk -p ${DISK[3]}
sgdisk -p ${DISK[4]}

# clear all existing partitions
# (if having LVM volumes there, those need to be cleared first)
for n in $(seq 1 4); do wipefs --all ${DISK[$n]} ; done

# determine the maximal usable sector of each drive
# (if the drives are not the same, will need to use the smallest one)
for n in $(seq 1 4); do sgdisk -p ${DISK[$n]} | grep "last usable sector" ; done
- here we determine the maximal usable sector, which is the minimal of the values printed by the above command
- if the disks are the same, this will most likely be the same value for the other disks, otherwise take the minimal one
Even if all the disks are the same, it is recommended to use a safety margin, ie. making the disks smaller than the maximal available size.
This can become important if one disk fails and needs to be replaced, you might then not be able to get the exact same disk. And as the different disk models might have a slightly different capacity, the new disk might be slightly smaller than the existing ones, thus would not being able to be used as a replacement for the failing disk.
Therefore it is recommended to make the partition somewhat smaller than the maximal capacity 4.
# All disks same: Use 8 MB less than the max available capacity
for n in $(seq 1 4); do sgdisk -n1:0:-8M -t1:BF03 ${DISK[$n]} ; done

# Not the same: Use the minimal sector
# (eventually deduct 16384 sectors for 8 MB or adjust appropriately)
DISK_SECT_MAX=<the min of the max sectors>
for n in $(seq 1 4); do sgdisk -n1:0:${DISK_SECT_MAX} -t1:BF03 ${DISK[$n]} ; done

# Print the partitions and check
for n in $(seq 1 4); do sgdisk -p ${DISK[$n]} ; done
4.3. Setting up the array (mdraid)
# create the array
mdadm --create /dev/md100 -l 5 -n 4 -e 1.2 -c 64 \
    ${DISK[1]}-part1 \
    ${DISK[2]}-part1 \
    ${DISK[3]}-part1 \
    ${DISK[4]}-part1

# check the array status
mdadm --detail /dev/md100
- the above command shows the recommended settings for 4 RAID-5 drives
- in particular, we explicitly set the array chunk size (the
"-c"parameter) to 64 kiB, which is recommended for 4 disk underlying array for ZFS 5 - for 8 disks the recommended value is 32 kiB
4.4. Encrypting the partition
- in this case we show how to encrypt using the VeraCrypt instead of LUKS
- the key is stored on the root partition (which itself is encrypted)
# install the VeraCrypt
mkdir -p veracrypt && cd veracrypt

# check https://www.veracrypt.fr/en/Downloads.html
# for the newest version
wget https://launchpad.net/veracrypt/trunk/1.24-update7/+download/veracrypt-1.24-Update7-setup.tar.bz2

tar xjf veracrypt-1.24-Update7-setup.tar.bz2

./veracrypt-1.24-Update7-setup-console-x64


# generate the encryption key
# (stored on the encrypted root partition)
dd if=/dev/urandom bs=512 skip=4 count=4 iflag=fullblock | base64 -w 0 \
    > /etc/crypt/data-1.key

chmod go-rwx /etc/crypt/data-1.key


# encrypt the volume
veracrypt -c --volume-type=normal /dev/md100 --encryption=aes --hash=sha-512 --filesystem=none --pim=0 -k /etc/crypt/data-1.key -p "" --random-source=/dev/urandom --quick

# add the crypttab entry
echo "data-1 /dev/md100 /dev/null tcrypt,tcrypt-veracrypt,tcrypt-keyfile=/etc/crypt/data-1.key,noearly" \
    >> /etc/crypttab

# start the encrypted disk
cryptdisks_start data-1
- note the
"noearly"option, which is important in this case (to start the decryption only after the MD RAID is already mounted)
- you can play with the encryption parameters (can choose a different encryption type, hash, PIM etc.)
- using the
"--quick"parameter: causes the volume just to be created, but not random filled (much faster, but less secure) - you can eventually remove it, but then creating the volume might take a very long time with very drives (in my case would be 32 TB which would take ages)
4.5. Creating the ZFS pool
- now we can create the data pool and eventual datasets on top of the encrypted drive
# create the "data" pool
zpool create -f \
    -o ashift=12 \
    -O acltype=posixacl \
    -O canmount=off \
    -O compression=lz4 \
    -O dnodesize=auto \
    -O normalization=formD \
    -O atime=off \
    -O relatime=on \
    -O xattr=sa \
    -O mountpoint=/data \
    data-pool \
    /dev/mapper/data-1

# for SSD: Set the auto-trim
zpool set autotrim=on data-pool

# test the pool status
zpool status data-pool
- then we can create some datasets
- in particular, to organize stuff keep in mind that each separate dataset can create its own COW snapshots
# create the main dataset
zfs create -o canmount=off -o mountpoint=none data-pool/DATA

# create the main mount data set
zfs create \
    -o canmount=noauto \
    -o mountpoint=/data \
    data-pool/DATA/data

# create media data sets
zfs create \
    -o com.ubuntu.zsys:bootfs=no \
    data-pool/DATA/data/media

zfs create data-pool/DATA/data/media/movies
zfs create data-pool/DATA/data/media/pictures
zfs create data-pool/DATA/data/media/music

# etc. - create data sets as needed
# ...

# eventually setup some permissions
chown root:sambashare /data/media/*
chmod -R g+w /data/media/*
# etc.

# check with:
ls -al /data/media
- note that all the data sets share the total space, so there is no need for thin provisioning
(it is eventually also possible to setup quota for particular data sets)
5. Next steps
In the next part we’ll setup the reporting (SMART etc.) and complete the basic system setup.


Leave a comment