
Minimal installation of Solaris 10 with Sun Studio: System installation
4. Extra packages
4.1. Java SDK
To install the recent Java SDK or JRE, we downloaded the package before. Now it needs to be transferred to the machine.
First, create the target directory on the Solaris machine (which can be completely removed afterwards, as there will be some funky unpacking business going on):
# mkdir /jdk-install
# chmod 777 /jdk-install
If the Java SDK package was downloaded under Linux, it can be transferred via the “scp” command:
[username@client]$ scp ~/Download/jdk-8u131-solaris-x64.tar.Z username@sol10-machine:/jdk-install/
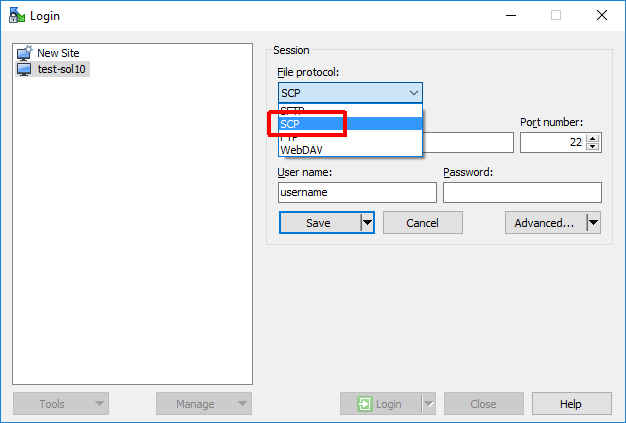
Under Windows the WinSCP client can be used to copy the package. You can import the machine settings from PuTTY. But make sure to change the default file protocol to “SCP” (“SFTP” would require a different service which is not running on the Solaris machine):
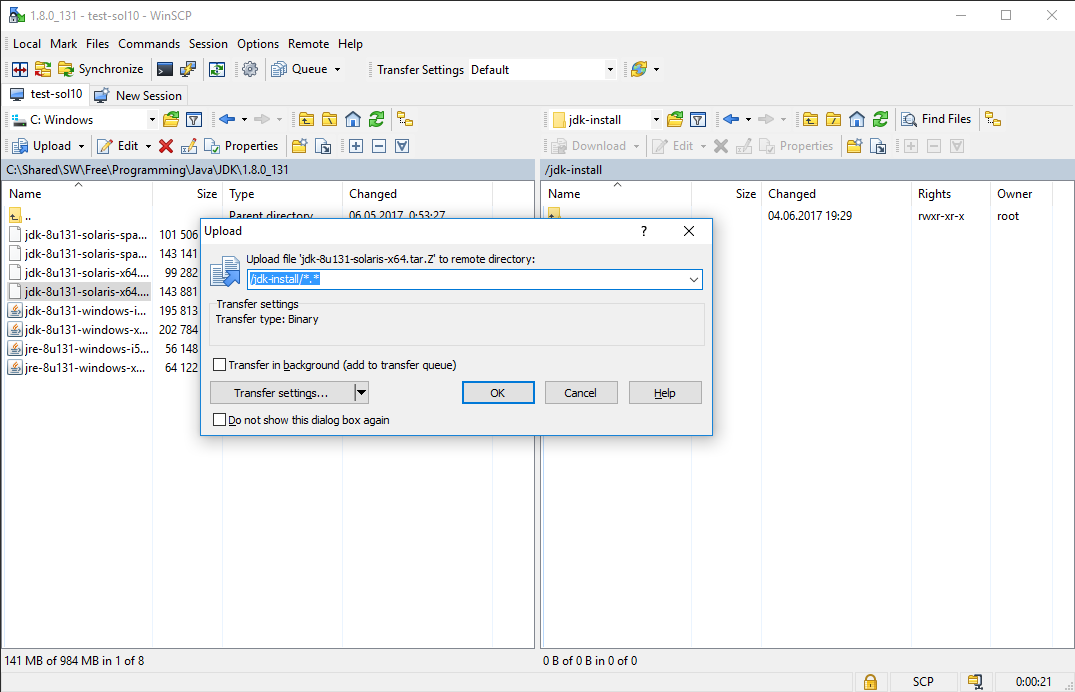
Transfer the file to the target directory (locate it first in the right panel):
Before installing the Java SDK, the pre-requisites need to be installed from the Solaris 10 installation media (if not already installed during the system installation as recommended):
- mount the installation media
- add the packages:
# pkgadd -d /cdrom/Solaris_10/Product SUNWctpls SUNWmfrun
To install the Java SDK on Solaris (under the “root” user; use the appropriate file name which you downloaded):
# cd /jdk-install
# zcat jdk-8u131-solaris-x64.tar.Z | tar xf -
# pkgadd -d . SUNWj8rt SUNWj8dev SUNWj8cfg SUNWj8man
Confirm the installation by checking the Java version:
# java -version
java version "1.8.0_131"
Java(TM) SE Runtime Environment (build 1.8.0_131-b11)
Java HotSpot(TM) 64-Bit Server VM (build 25.131-b11, mixed mode)
If everything works, the installation directory can be removed:
# cd /
# rm -rf /jdk-install
4.2. Solaris (Sun) Studio
The “Oracle Solaris Studio” (originally “Sun Sudio”) is the “native” C/C++ compiler suite used on Solaris. The system is also supported by the GCC, however you might want to make sure your applications build with the native compiler as well.
First step is to transfer the installation package to the machine. This it pretty much the same as in the Java SDK case.
We will create the target directory first:
# mkdir /studio-install
# chmod 777 /studio-install
Then transfer the installation file - under Linux by using "scp":
[username@client]$ scp ~/Download/SolarisStudio12.4-solaris-x86-pkg.tar.bz2 username@sol10-machine:/studio-install/
Under Windows the WinSCP client can be used again.
Before installing the Sun Studio, the pre-requisites need to be installed from the Solaris 10 installation media (if not already installed during the system installation as recommended):
- mount the installation media
- add the packages:
# pkgadd -d /cdrom/Solaris_10/Product SUNWhea SUNWarc SUNWcpcu SUNWcpp SUNWcsl SUNWlibC SUNWtoo SUNWlibmr SUNWlibm SUNWlibms SUNWpiclh SUNWpiclr SUNWpiclu SUNWsprot SUNWlibstdcxx4 SUNWrcmdc SUNWrcmdr SUNWrcmds SUNWtftp SUNWtnetc SUNWscpr SUNWscpu SUNWPython SUNWPython-devel
The list of pre-requisites is available here: Required System Software Packages
To install the Solaris Studio (under the “root” user):
# cd /studio-install
# bzip2 -dc SolarisStudio12.4-solaris-x86-pkg.tar.bz2 | tar xf -
# cd SolarisStudio12.4-solaris-x86-pkg
# ./solarisstudio.sh --non-interactive --tempdir /studio-install/tmp --install-components c-and-cpp-compilers,code-analyzer-tool,dbx-debugger,dbxtool,dmake,fortran-compiler,oic,performance-and-thread-analysis-tools,performance-library
As we did not install the graphic desktop and do not plan to use the Solaris Studio IDE, we will not install it.
See here for the list of available Solaris Studio components and the installation options:
- Command-Line Options for the Installer, Uninstaller, and install_patches Utility for Oracle Solaris 10 and Linux Platforms
- Components and Package Names in Oracle Solaris Studio
Note the use of the "--tempdir" parameter - the default location is “/tmp”, however as it is a relatively small partition by default, it might not have enough space required for the Solaris Studio installation.
Because we installed the system by using the minimal install option and not the recommended “Developer System Support” or “Entire Distribution” options, the installer will complain about that. This can be ignored now, as we explicitly added/installed all the prerequisites of the Sun Studio:
[2017-06-05 02:35:37.315]: WARNING - Required patches should be installed. The following patches need to be installed for Oracle Solaris Studio to function correctly: 120754-13, 119964-31, 147437-02, 119961-13. You can use the install_patches.sh utility in your download directory to install the patches.
[2017-06-05 02:35:37.315]: WARNING - Unsupported Solaris meta cluster is detected. To be able to use the compilers, one of the following Solaris meta clusters must be installed: Entire Solaris Software Group, Entire Solaris Software Group Plus OEM Support or Developer Solaris Software Group.
Next step is to install the required patches (as the other warning message suggests):
# ./install_patches.sh
Next step is to add the Solaris Studio paths to the environment (alternative is to use the "--create-symlinks" for the installer, but for me it didn’t work and the non-interactive installer choked on that option).
First we will add the Solaris Studio man path. This can be done in the “/etc/profile” file, by adding the “MANPATH” settings:
#ident  "@(#)profile    1.19    01/03/13 SMI"   /* SVr4.0 1.3   */

# The profile that all logins get before using their own .profile.

trap ""  2 3
MANPATH=$MANPATH:/opt/solarisstudio12.4/man
export LOGNAME PATH MANPATH

...
The path can be also added here, but it is better to add it to the “/etc/default/login” file, to be also available in the non-interactive shells - this is in particular essential for Solaris Studio to work within Jenkins build agent:
# chmod u+w /etc/default/login
# vi /etc/default/login
(need to change the permissions first, because the file is read-only by default)
Find the PATH setting (might be commented out) and change it to (or add):
PATH=/usr/bin:/bin:/usr/sbin:/opt/solarisstudio12.4/bin:/usr/sfw/bin:/usr/sfw/i386-sun-solaris2.10/bin
(note adding the path before “/usr/sfw/bin” to take the precedence)
When done, change the rights back to read-only:
# chmod u-w /etc/default/login
For the settings to take effect, logout and login back (or restart the machine). Confirm the installation by checking the “cc” (Sun C compiler) and “CC” (Sun C++ compiler) commands - under the regular user:
$ which cc
/opt/solarisstudio12.4/bin/cc
$ which CC
/opt/solarisstudio12.4/bin/CC
$ cc -V
cc: Sun C 5.13 SunOS_i386 2014/10/20
$ CC -V
CC: Sun C++ 5.13 SunOS_i386 2014/10/20
The "man" path can be tested by:
$ man codean
Reformatting page. Please wait... done.

User Commands                                           codean(1)

NAME
     codean - Command Line Interface of Code Analyzer
...
If everything works, the installation directory can be removed (under the “root” user):
# cd /
# rm -rf /studio-install


Leave a comment