
ZFS RAID over different size drives
Creating a ZFS RAID over different size drives (2 x 1 TB + 3 x 2 TB for 8 TB RAID-5 setup). This was done as part of the “Project Ares” NAS box setup for additional data storage.
Update 08 Jul 2022
Added the alternative for adding the new VDEV to existing ZFS pool.
1. Introduction
In addition to the primary new 4 x 8 TB disks, I still had these other disks lying around that I could reuse:
| Model | Line | Factor | Capacity | Cache | RPM |
|---|---|---|---|---|---|
| WDC WD20EURS | WD Green | 3.5” | 2 TB | 64 MB | 5,400 |
| WDC WD10JPVX | WD Blue | 2.5” | 1 TB | 8 MB | 5,400 |
| SAMSUNG HD203WI | SpinPoint F3 | 3.5” | 2 TB | 32 MB | 5,400 |
| SAMSUNG HD103SI | SpinPoint F2 | 3.5” | 1 TB | 32 MB | 5,400 |
| ST2000LM015 | Barracuda | 2.5” | 2 TB | 128 MB | 5,400 |
As you can see, those disks are of very different manufacturers, sizes and formats.
The 3 x 3.5” disks were taken from the original NAS box (were not in RAID in there), the other 2 x 2.5” ones I just had left there from the previous laptop upgrades (first upgraded the 1 TB HDD by the 2 TB HDD and then replaced by a new 2 TB SSD).
In addition, the last 2 TB 2.5” is a SMR drive (which is generally not great for the performance, event though it has a much larger cache, and was the main reason for upgrading it for the SSD in the laptop).
Because of the Silverstone SST-CS381 case (+ the 8-port HBA controller) being able to accommodate all of them, I still wanted to reuse them for the extra storage capacity (obviously), ideally as a second ZFS RAID group.
That means that at the end of the day the Silverstone case was able to incorporate all these 11 disks:
- 4 x 8 TB RAID (HBA)
- 5 mentioned above (HBA + MB SATA)
- 1 x 500 GB SSD (on board NVME)
- 1 x 750 GB HDD (MB SATA)
- one SSD slot still left on the MB
Combination of such variety of drives is discouraged in general, as each drive has different capabilities and speed (in particular, I expect the SMR drive to be the bottleneck).
While it can be done and isn’t even that difficult to setup, you need to know what to expect of such setup and what are its limitations and dangers.
In particular, I’d strongly discourage to use such disk setup for performance sensitive applications and frequently changing data, like for example hosting databases or virtual machines.
This solution also has somewhat greater risk of failure, therefore I wouldn’t recommend to use it for critical data that you absolutely cannot afford to lose.
In any case, very important data should be backed in multiple places anyway, ideally even in different physical locations - the RAID-5/6 isn’t an appropriate fail-safe backup option, although preventing the data loss to some extent due to the redundancy.
For example, it doesn’t prevent accidental deletion of files, virus/ransomware attacks, or even complete data loss in case of power surge, fire or similar incidents that are capable of destroying the entire machine.
Having said all that, the significant extra capacity is nice to have when I had these disks lying around, and can be still useful for data that are not being changed frequently (archived data, extra backups or alike, large amounts of data that can be eventually re-downloaded like local distro mirror caches etc.).
2. The disk setup and options
As you can see, if the 2 x 1 TB drives could be joined together, an additional 4 x 2 TB RAID-5 could be created.
And indeed, there are 2 (+1) ways to achieve that in the principle, each with its benefits and limitations:
2.1. Creating 1 TB partitions over all drives
- this means splitting the larger 2 TB drives in half and create 2 x 1 TB partitions on each
- then using the first partition of each 2 TB drive (3x) + one of the 1 TB drives for a first RAID group, and the second partition of each 2 TB drive + the other 1 TB drive for a second group
Advantages:
- only using the native ZFS solution
- slightly more safe
Disadvantages:
- multiple smaller RAID groups
- performance consequences because of having multiple pools on the same physical disks
- more difficult expansion if the 2 x 1 TB eventually replaced by a larger drive
(would still need to keep the multiple pools or expand the disks one-by-one)
2.2. Joining the 2 x 1 TB drives into a single 2 TB volume
- can use the MD-RAID or LVM to join the smaller drives (striping RAID-0) and create a single 2 TB volume over them
- then using the 3 x 2 TB drives + the joined 2 TB volume to create a single 4 x 2 TB ZFS RAID group
Advantages:
- just a single RAID-5 group
- easier to expand later if needed
- single pool on each disk - better performance
- striping the 2 x 1 TB disks (RAID-0) will make them faster
(but the whole array speed will still be limited by the other single drives indeed, most likely the SMR drive in particular)Disadvantages:
- extra complexity of using the additional MD-RAID layer
(however with the improved speed of that volume)- twice as high chance of a disk failure for the RAID-0 (2 x 1 TB) volume
(although either one or both failing will just count as a single drive failure for the whole RAID-5 group)
2.3. Selling the 2 x 1 TB drives and buying a 2 TB one
Another option would be to just sell the smaller drives and buy a larger one.
Advantages:
- cleanest setup (just 4 x 2 TB drives)
Disadvantages:
- buying a brand new drive would mean additional financial costs:
- selling the 2 smaller used drives would most likely not cover the costs of buying a brand new larger one
- buying an used drive is risky:
- could eventually find an used disk with the price covered by selling the smaller disks
- but there is a risk of buying a damaged worn-out drive with disk errors
- whereas I know the smaller disks I have, they were reliable until now and don’t have any SMART disk errors and bad sectors yet (and I know that they’ve been handled well)
- and in any case there are the time and effort costs:
- would need to manage the disk selling, and it can take a considerable amount of time until a buyer is found (if any)
- whereas I just have the current disks available right now
So all that being said, I rejected the option #3 right away, and decided to go with the second option (using the MD-RAID to join the smaller disks), as it has better upgrade options and might have somewhat better performance (while being slightly less safe, but not all that much actually).
2.x. Disk mount/connection considerations
As I already had the 4 x 8 TB disks on the 4 (of 8) HBA connections and wanted to connect 5 another drives, one of the drives needs to be connected to the motherboard SATA port (and be mounted internally inside the case). This is not an issue however, as I’m using the SW RAID (ZFS) and not the HBA hardware RAID capabilities, so it actually doesn’t matter much that one of the disks is connected outside of the HBA and everything works just fine.
The 2 disk cages (4 disks each) have an additional 2.5” internal mount on the top, which I used for 2 of the drives connected to the system (the 750 GB system mirror disk + one of the extra disks, in particular the 2 TB SMR one).
I’ve spread the disk groups across the cages like this:
| SYSTEM: 750 GB ST9750420AS | POOL-2: 2 TB ST2000LM015 |
|---|---|
| POOL-2: 2 TB HD203WI | POOL-1: 8 TB WD80EZAZ |
| POOL-1: 8 TB WD80EZAZ | POOL-2: 1 TB WD10JPVX |
| POOL-2: 2 TB WD20EURS | POOL-1: 8 TB WD80EZAZ |
| POOL-1: 8 TB WD80EZAZ | POOL-2: 1 TB HD103SI |
This configuration seems to give the best disk temperature readings:
- when the entire disk pool group (POOL-1) was all in a single cage, the disk temperatures were much worse (especially for the middle drives) than when interleaved across the cages like this
- in particular, for the second group I’ve put the disks that had the lowest standalone temperatures into the middle positions
- notice that one of the middle disks is the 2.5” drive (in the right disk cage) that leaves more empty space in the disk mount, thus allowing better airflow through the middle of the disk cage
- the better temperatures in this configuration can also be explained by the fact that when a single group is working, it cools better when spread across the cages
(especially when the other group is idle, which is very often the case)
3. Setting up the RAID
3.1. Preparing the setup
As the device designators are assigned quite randomly on the startup (especially for the HBA connected drives that are being initialized in non-deterministic order), it is strongly recommended to use the “/dev/disk/by-id/” or at least “/dev/disk/by-path/” aliases when assigning the drives to the volume and RAID groups.
I was using the “by-path” aliases before, but I prefer to use the “by-id” descriptors now:
- by-path: works to keep the drives assigned correctly, but the disk positions cannot be switched
- by-id: will always find the right drive even if you switch the disk positions
I was initially thinking that the “by-path” will allow easier drive replacement in case of a single disk failure, but in such case the new disk needs to be initialized anyway and it is not a big difference to replace the disk when the disk id is used.
# enter the root console
sudo -i

# prefer to use the disk-by-id to avoid confusion with the disk assignment
ls -al /dev/disk/by-id/

# set the disk ids appropriately
# (use the physical disk links without the "-partN" if any)

# the DISK[1] and DISK[2] are the 1 TB drives
DISK[1]=/dev/disk/by-id/scsi-SATA_WDC_WD10JPVX-08J_WD-WX41A14E0993
DISK[2]=/dev/disk/by-id/scsi-SATA_SAMSUNG_HD103SI_S1VSJ9CS609711

# the next are the 2 TB drives
DISK[3]=/dev/disk/by-id/scsi-SATA_WDC_WD20EURS-73S_WD-WCAZA6521446
DISK[4]=/dev/disk/by-id/scsi-SATA_SAMSUNG_HD203WI_S1UYJ1MZ100123
DISK[5]=/dev/disk/by-id/scsi-SATA_ST2000LM015-2E81_ZDZ0XVRQ
Note that some of the disks might have multiple aliases - for my build I preferred the ones starting with the “scsi-SATA_…” as they seem to be the most uniform ones (also for the HBA).
3.2. Cleaning the disks
- will create a single partition covering the entire disk for each of the RAID disks
- the disk partition will then be used to create the array
# show the current partitions on each disk
# !!! double-check that they are the correct ones !!!
# (will destroy all existing data)
# - check the IDs, disk sizes, existing partitions etc.
sgdisk -p ${DISK[1]}
sgdisk -p ${DISK[2]}
sgdisk -p ${DISK[3]}
sgdisk -p ${DISK[4]}
sgdisk -p ${DISK[5]}

# clear all existing partitions
# (if having LVM volumes there, those need to be cleared first)
for n in $(seq 1 5); do wipefs --all ${DISK[$n]} ; done
3.3. Merging the smaller disks to MD-RAID volume
- creating the merge volume (RAID-0 striped) of the smaller 1 TB disks
- making the partitions slightly smaller than the max disk capacity to allow eventual disk replacement (the disk sizes might slightly differ sometimes)
# create the disk partitions (left 4 MB at the end)
sgdisk -n1:0:-4M -t1:FD00 -c1:"Group 2 RAID-0" ${DISK[1]}
sgdisk -n1:0:-4M -t1:FD00 -c1:"Group 2 RAID-0" ${DISK[2]}

# create the striped RAID-0 volume
mdadm --create /dev/md20 -l 0 -n 2 -e 1.2 ${DISK[1]}-part1 ${DISK[2]}-part1

# check the array status
mdadm --detail /dev/md20
- the status report:
/dev/md20:
           Version : 1.2
     Creation Time : Fri Oct 30 01:28:57 2020
        Raid Level : raid0
        Array Size : 1953250304 (1862.76 GiB 2000.13 GB)
      Raid Devices : 2
     Total Devices : 2
       Persistence : Superblock is persistent

       Update Time : Fri Oct 30 01:28:57 2020
             State : clean
    Active Devices : 2
   Working Devices : 2
    Failed Devices : 0
     Spare Devices : 0

            Layout : -unknown-
        Chunk Size : 512K

Consistency Policy : none

              Name : fs-ares:20  (local to host fs-ares)
              UUID : cb00b247:686f5da9:dae84082:39a3775e
            Events : 0

    Number   Major   Minor   RaidDevice State
       0       8       97        0      active sync   /dev/sdg1
       1       8      113        1      active sync   /dev/sdh1
3.4. Creating the ZFS pool
Now we can start creating / adding the ZFS pool.
There are 2 basic options, each with its advantages / disadvantages:
1. Creating a new separate pool
Advantages:
- the space is completely separate
- can change / remove separately
Disadvantages:
- need to decide where to put what data
2. Adding as a new VDEV to an existing pool
Advantages:
- a single common disk space
Disadvantages:
- cannot be removed from the group later
- if any of the RAID groups fails, all data is lost (including the data on the other RAID group that didn’t fail!)
- cannot decide where the data will go (issue when the disk groups do not have equivalent performance characteristics)
Considering the above, I decided to create a separate zpool for the new group, in particular for these main reasons:
- this additional disk group is expected to have very different (and worse) performance characteristics to the primary disk group (that is made of 4 equal 8 TB disks)
- the disks are relatively old (some of them approx. 10 years) so there is a significant risk of failure (even though they currently do not report any SMART errors)
- thus want to decide what specific data to store there (to avoid storing critical or performance sensitive data on this disk group)
On the other hand, when the additional group would consist of equal disks of similar performance to the primary disk group, I’d prefer to join the groups together (to just get a common single large disk space and not have to decide where to put what).
Other alternative would be to merge all these extra disks into additional 8 TB space via MD-RAID or LVM and add it as a 5th disk to the primary array (either adding the full +8 TB capacity to the RAID-5, or increasing the redundancy by converting the whole setup to a double-parity RAID-6).
But in that case the inconsistent performance (in both cases) and eventually increased risk of a failure (in the RAID-5 case) would remain (and the RAID-6 case wouldn’t add any extra capacity), not even speaking of the necessity to re-create the whole primary array (and backup/restore the data).
Thus creating a separate pool and increasing the system capacity by additional 6 TB seems to be the sweetspot here.
- creating the new pool:
# create the "extra" pool
zpool create -f \
    -o ashift=12 \
    -O acltype=posixacl \
    -O canmount=off \
    -O compression=lz4 \
    -O dnodesize=auto \
    -O normalization=formD \
    -O atime=off \
    -O relatime=on \
    -O xattr=sa \
    -O mountpoint=none \
    xpool \
    raidz1 \
    /dev/md20 \
    ${DISK[3]} \
    ${DISK[4]} \
    ${DISK[5]}

# check the pool status
zpool status xpool
- the pool status report:
  pool: xpool
 state: ONLINE
  scan: none requested
config:

        NAME                                            STATE     READ WRITE CKSUM
        xpool                                           ONLINE       0     0     0
          raidz1-0                                      ONLINE       0     0     0
            md20                                        ONLINE       0     0     0
            scsi-SATA_WDC_WD20EURS-73S_WD-WCAZA6521446  ONLINE       0     0     0
            scsi-SATA_SAMSUNG_HD203WI_S1UYJ1MZ100123    ONLINE       0     0     0
            scsi-SATA_ST2000LM015-2E81_ZDZ0XVRQ         ONLINE       0     0     0

errors: No known data errors
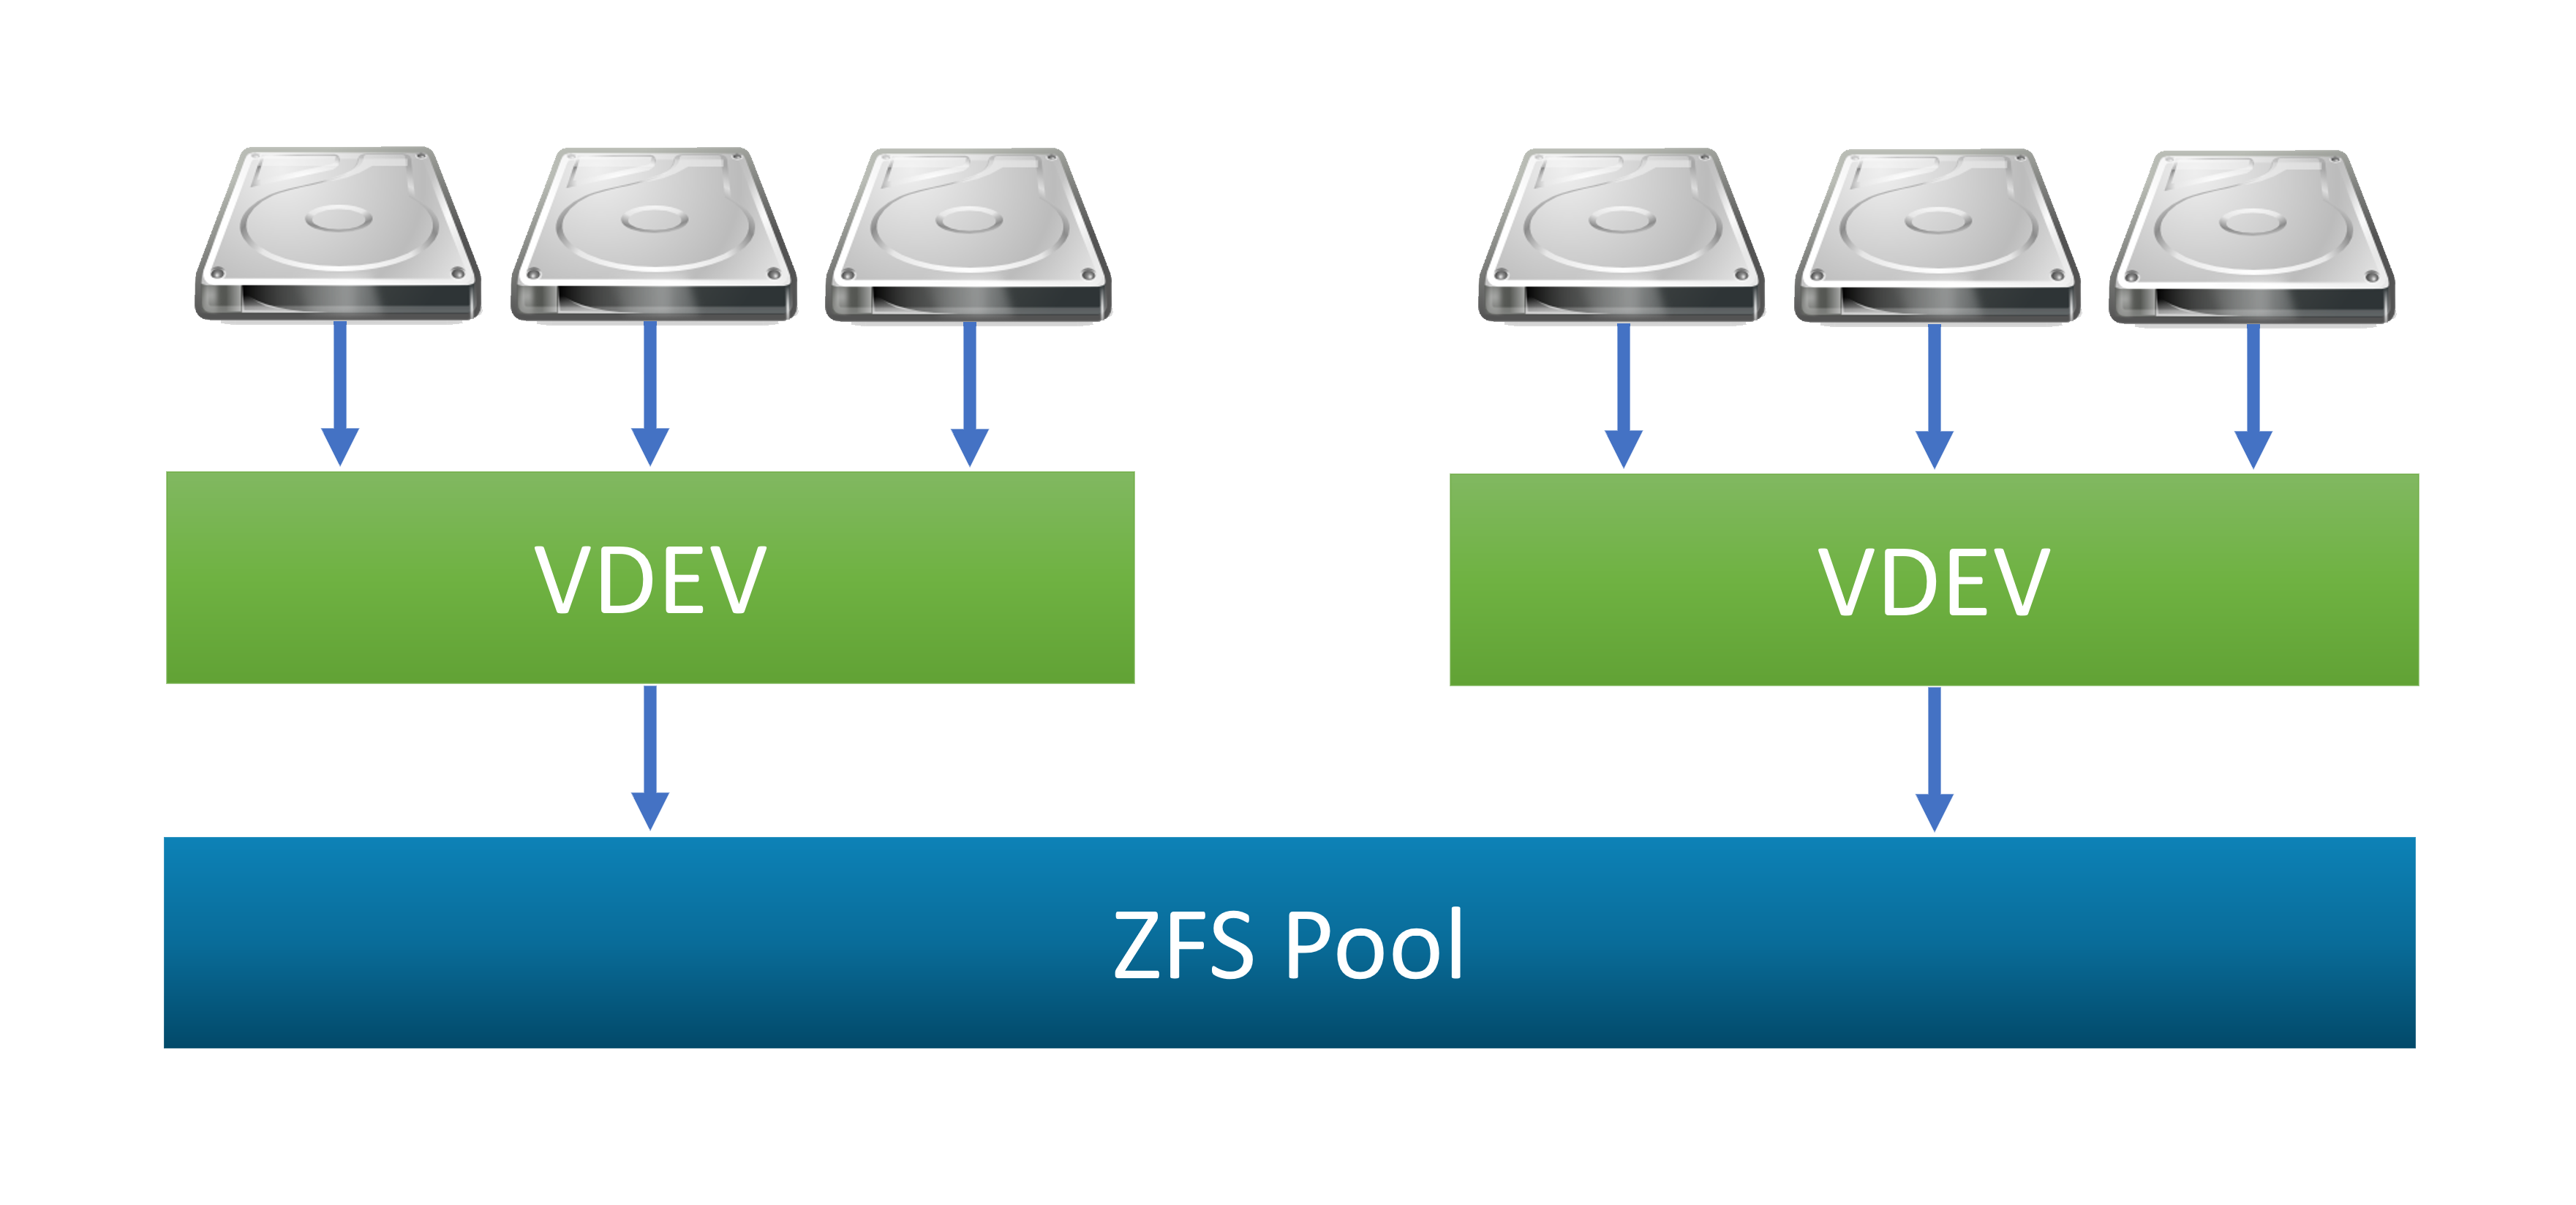
3.4.1 Alternative: Adding VDEV to existing zpool
As mentioned above, the other option would be to add the VDEV to an existing data zpool. I decided to use separate pools for the reasons mentioned, but for the sake of completeness this would be the command to add the VDEV group to an existing zpool to use single space:
zpool add dpool \
    raidz1 \
    /dev/md20 \
    ${DISK[3]} \
    ${DISK[4]} \
    ${DISK[5]}

# check the pool status
zpool status dpool
- after this the pool status should show 2 VDEV groups under the single zpool, similar to this (using my “Project Ares” configuration):
  pool: dpool
 state: ONLINE
  scan: none requested
config:

        NAME                                            STATE     READ WRITE CKSUM
        dpool                                           ONLINE       0     0     0
          raidz1-0                                      ONLINE       0     0     0
            scsi-SATA_WDC_WD80EZAZ-11T_1EJXU34Z         ONLINE       0     0     0
            scsi-SATA_WDC_WD80EZAZ-11T_1EK01TEZ         ONLINE       0     0     0
            scsi-SATA_WDC_WD80EZAZ-11T_1EJU1VUZ         ONLINE       0     0     0
            scsi-SATA_WDC_WD80EZAZ-11T_1EJRXGYZ         ONLINE       0     0     0
          raidz1-1                                      ONLINE       0     0     0
            md20                                        ONLINE       0     0     0
            scsi-SATA_WDC_WD20EURS-73S_WD-WCAZA6521446  ONLINE       0     0     0
            scsi-SATA_SAMSUNG_HD203WI_S1UYJ1MZ100123    ONLINE       0     0     0
            scsi-SATA_ST2000LM015-2E81_ZDZ0XVRQ         ONLINE       0     0     0

errors: No known data errors
3.5. Creating the ZFS data sets
- will use the same encryption key as for the other data volume
# create the main dataset
zfs create \
    -o canmount=off \
    -o mountpoint=none \
    xpool/DATA

# create the cache file
touch /etc/zfs/zfs-list.cache/xpool

# create the main mount data set
# (setting up the encryption)
zfs create \
    -o canmount=noauto \
    -o mountpoint=/data2 \
    -o encryption=aes-256-gcm \
    -o keyformat=hex \
    -o keylocation=file:///etc/crypt/zfs/data.key \
    xpool/DATA/data

# mount the data set
zfs mount xpool/DATA/data

# create data sets
zfs create \
    -o com.ubuntu.zsys:bootfs=no \
    xpool/DATA/data/unstable

zfs create xpool/DATA/data/unstable/Test

zfs create \
    -o com.ubuntu.zsys:bootfs=no \
    -o mountpoint=none \
    xpool/DATA/data/shared

zfs create \
    -o mountpoint=/data/shared/Drivers \
    xpool/DATA/data/shared/Drivers

zfs create \
    -o com.ubuntu.zsys:bootfs=no \
    xpool/DATA/data/media

zfs create xpool/DATA/data/media/Video

# etc. - create data sets as needed
# ...

# check the cache file
cat /etc/zfs/zfs-list.cache/xpool

# check the encryption:
# - expect encrypted
zfs get encryption /data2/unstable/Test

# check with:
ls -al /data2/unstable
3.6. Validation
- checking the pool and dataset size with various tools:
# show the zpool info
zpool list xpool

# result:
NAME    SIZE  ALLOC   FREE  CKPOINT  EXPANDSZ   FRAG    CAP  DEDUP    HEALTH  ALTROOT
xpool  7.27T  3.77M  7.27T        -         -     0%     0%  1.00x    ONLINE  -


# show the datasets info
zfs list -r xpool

# result:
NAME                             USED  AVAIL     REFER  MOUNTPOINT
xpool                           2.54M  5.11T      140K  none
xpool/DATA                      1.50M  5.11T      140K  none
xpool/DATA/data                 1.36M  5.11T      267K  /data2
xpool/DATA/data/unstable        1.10M  5.11T      360K  /data2/unstable
xpool/DATA/data/unstable/Test    256K  5.11T      256K  /data2/unstable/Test


# using the df command
df -h /data2/media/*

# result:
Filesystem                      Size  Used Avail Use% Mounted on
xpool/DATA/data/unstable/Test   5.2T  256K  5.2T   1% /data2/unstable/Test
- the
"zpool"command shows the total capacity (8 TB = 7.27 TiB) - the expected available capacity is 6 TB = 5.46 TiB (one of the RAID disks spent on the parity)
- so we can see that the capacity order of magnitude is correct (i.e. creating the RAID-5 over all the disks worked)
- but technically we’re still missing approx. 300 GB of space
The “missing” space is basically due to the ZFS overhead.
There are some extra metadata structures the ZFS creates on the disk, as described here:
ZFS Storage Overhead
In particular, the space is mostly taken by the so-called “slop space reservation”, used to ensure the proper functionality when the pool is close to be full.
This is usually reserved to 1/32th of the pool capacity, i.e. 7.27 TiB / 32 = 0.227 TiB (~ 233 GiB) in this case. In addition, the RAIDZ actually allocates slightly more than one drive capacity for the parity and padding (in this case 2.17 TB instead of just 2).
You can also refer to the ZFS / RAIDZ Capacity Calculator for calculating the ZFS RAID sizes and overhead.
4. Speed comparison
As mentioned, the new mixed drives group was expected to have the different performance characteristics than the primary 4 x 8 TB array.
And this is indeed the case, clearly visible when the arrays were “scrubbed” (= verified for errors).
When checking the scrub stats:
# the primary pool stats
  pool: dpool
 state: ONLINE
  scan: scrub in progress since Sun Nov  8 00:24:02 2020
        4.55T scanned at 1.02G/s, 2.45T issued at 559M/s, 8.30T total
        0B repaired, 29.47% done, 0 days 03:02:56 to go
...

# the secondary pool stats
  pool: xpool
 state: ONLINE
  scan: scrub in progress since Sun Nov  8 00:24:12 2020
        1.50T scanned at 344M/s, 848G issued at 190M/s, 1.50T total
        0B repaired, 55.10% done, 0 days 01:02:10 to go
...
There the performance difference can be seen very clearly:
- the primary array scrubbing at the rate of approx. 560 MB/s
- the secondary array rate being approx. 190 MB/s
Here in particular you can see, why joining these arrays together into a single pool (a common big volume) might not have been a great idea.


Leave a comment