
SSH password-less login
The article describes how to generate and use the SSH keys to login to remote machines instead of using passwords, and the basic troubleshooting.
1. Overview
The SSH password-less login works the following way:
- Create a private/public key pair on the client (source) machine.
- Transfer and insert the public key into the “.ssh/authorized_keys” file on the remote (target) machine.
- Next time, the SSH client will automatically offer the public key to the remote machine, and if it is found in the authorized keys file, the access is granted without having to provide the password.
The points above are heavily simplified - see e.g. Understanding the SSH Encryption and Connection Process for further details.
2. Security considerations
If used properly, the SSH password-less login is not only more convenient than the password-based login, but more secure as well - the 2048-bit cryptographic key is far more complex than even the strongest passwords:
- a random generated 20 character password containing upper / lower / digits / special chars has the cryptographic strength of somewhat between 100-128 bits, and is close to impossible to remember
- compared to the usual 2048-bit strength of the cryptographic key being order of magnitude stronger
However, for the SSH password-less login to remain secure, some basic rules need to be respected:
- the private SSH key must be kept absolutely secret, nobody else should be ever allowed to gain access to it, because then such an attacker can login to the remote computer as it was you
- therefore it is strongly recommended to still protect the private key by a password - which is possible (however then it is no longer “password-less” login in the true sense, as you then need to provide the password for the private key); to not have to provide the password every time, it is possible to setup the ssh-agent to cache the unlocked SSH keys in memory (however it is relatively complex to setup, and not covered by the article)
For some further information about the SSH key security, see e.g. here: Are passwordless SSH logins more secure?
3. UNIX/Linux SSH Clients
3.1. Generating the SSH key
The SSH keys are generated by the "ssh-keygen" command. To generate the private and public key pair:
[username@client]$ ssh-keygen -t RSA -b 2048
Generating public/private RSA key pair.
Enter file in which to save the key (/home/username/.ssh/id_rsa):
Enter passphrase (empty for no passphrase):
Enter same passphrase again:
Your identification has been saved in /home/username/.ssh/id_rsa.
Your public key has been saved in /home/username/.ssh/id_rsa.pub.
The key fingerprint is:
10:fb:5e:05:0d:bf:e7:eb:56:a7:35:0f:65:ff:39:43 username@host
The key's randomart image is:
+--[ RSA 2048]----+
|      .   oo     |
|       o   o.    |
|      o     o    |
|       o   . .  o|
|        S . . .o.|
|       . .   o.E=|
|        .     o=*|
|              o=o|
|             oo o|
+-----------------+
The key type (RSA / DSA / …) can be specified by using the "-t" parameter, the bit size of the generated key with the "-b" parameter.
RSA / 2048 are normally the default values, so they do not need to be specified.
For the full list of the options you can run "ssh-keygen -?" or "man ssh-keygen".
Notice the public identity key file name (with the “.pub” extension).
Note that the generator asks for the password to protect the private key. It can be left empty, which is more convenient, but less secure, as already mentioned above (if the password is not set, anyone who obtains the private key can use it right away).
3.2. Transferring the SSH key to the remote machine
a) Automatic transfer via ssh-copy-id
The easiest way to transfer the key to the remote machine is to use the "ssh-copy-id" script.
This command also checks, if the key is already present on the remote machine to avoid adding duplicates:
[username@client]$ ssh-copy-id username@remote
Use the same user and machine name, as when you are logging in with "ssh" (the user name can be omitted if it is the same name as your client user name).
Note that as the key is not there yet, so you still have to provide the password when running the "ssh-copy-id".
b) Manual addition of the SSH public key
If the "ssh-copy-id" script is not provided by your UNIX/Linux distribution, or if you need to add the key manually for any other reason (e.g. adding a key generated on a different machine, possibly Windows), you can also add the key manually.
First, you need to print the public key for copying it:
[username@client]$ cat ~/.ssh/id_rsa.pub
Now you can copy it to the clipboard (if you are logged in a session which does not have the mouse and clipboard available, see the combined command at the end of this section). Use the public key name with the “*.pub” extension as generated in the previous step.
Then you need to login to the remote machine as usually (still with the password for now):
[username@client]$ ssh username@remote
If the “.ssh” directory does not exist on the remote machine yet, it needs to be created first:
[username@remote]$ mkdir -p ~/.ssh
Now the public key can be added into the “.ssh/authorized_keys” file:
[username@remote]$ vim ~/.ssh/authorized_keys
Use your favorite editor (however, some remote machines might only have "vim" or even just "vi" editors installed) and add the key from the clipboard, or use the combined command below.
For “vim / vi” the routine is as follows:
- press
"G"(i.e. the capital ‘g’ by"Shift + g") to move to the file end - press
"A"(i.e. the capital ‘a’ by"Shift + a") to switch to append mode at the end of the last line - press
"Enter"to create a new line - insert the key from the clipboard (select the key printed before and middle mouse click in the terminal, or right mouse click in the PuTTY)
- press
"Esc"key to leave the edit mode - save and exit the “vi” by:
":wq"and"Enter"(colon, then ‘w’ to write the changes and ‘q’ to quit the editor)
Alternatively, if under UNIX/Linux (and not e.g. copying a key generated under Windows by “PuTTYgen”):
[username@client]$ cat ~/.ssh/id_rsa.pub | ssh username@remote_host 'mkdir -p .ssh; cat >> .ssh/authorized_keys'
When the directory and/or the file were created manually, they usually have wrong permissions (depending on the umask setting). That needs to be fixed, otherwise the SSH server will not allow the connection:
[username@remote]$ chmod 700 ~/.ssh
[username@remote]$ chmod 600 ~/.ssh/authorized_keys
3.3. Testing the SSH key login to the remote machine
After the generating and the transfer steps are done, the setup can be tested by simply trying to login to the remote machine as usual:
[username@client]$ ssh username@remote
This time the login should succeed without the need to provide the password.
If the SSH client still asks for the password when logging in, consult the “Troubleshooting” section of the article.
(note however that if you did set a password for the private key, the SSH client will ask for that password to be able to load it)
4. Windows (Putty)
Under Windows, the PuTTY SSH client is commonly used to access the UNIX / Linux SSH remote machines. Together with the PuTTYgen generator, it is possible to generate and use a SSH key with PuTTY.
4.1. Generating the SSH key
To generate the SSH key by the PuTTYgen tool:
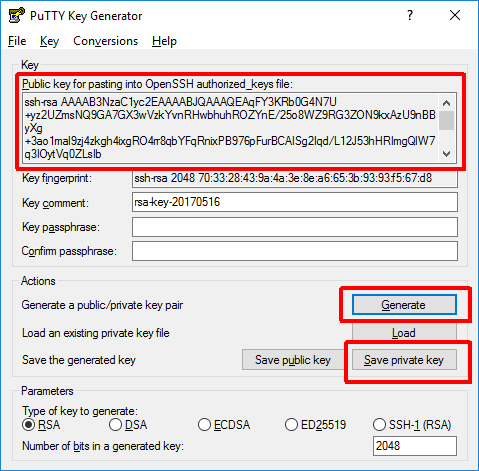
- (Optional) Select the type of the key (RSA / DSA / …) and the bit strength (the defaults RSA / 2048 usually work well).
- Press the “Generate” button.
- Move the mouse over the PuTTYgen “Key” area as requested until enough randomness is collected.
- (Optional) Set the password for the generated key (recommended for increased security; encrypting the saved private key file by the Windows EFS encryption on a NTFS drive is a reasonably secure and convenient alternative).
- Save the private key to a secure location (eventually encrypted disk and/or encrypt by EFS). The file must be kept secret, so that nobody else has access to it, otherwise it could be used to login to the remote machine with your credentials.
- (Optional) Save the public key (does not actually need to be saved, as it can be always recovered by using the “Load” button and loading the private key).
- Copy the public key into the clipboard (
"Ctrl + C") for pasting into the “.ssh/authorized_keys” file on the remote machine. (make sure to select the entire public key before copying into the clipboard - the “Public key” box only shows part of the public key contents at the time, you need to scroll down to select it completely)
4.2. Transferring the SSH key to the remote machine
Connect to the remote machine with PuTTY as usual, and then manually insert the SSH key from the clipboard to the “.ssh/authorized_keys” file as described in the Manual addition of the SSH public key section.
4.3. Setting up the PuTTY for password-less connection
To use the SSH key for the authentication, the PuTTY connection needs to be instructed to do so.
Open the PuTTY Configuration and navigate to the “Connection / SSH / Auth” settings (if you already have the connection stored, make sure to load it first), and browse for the private key as you saved it by the PuTTYgen tool:

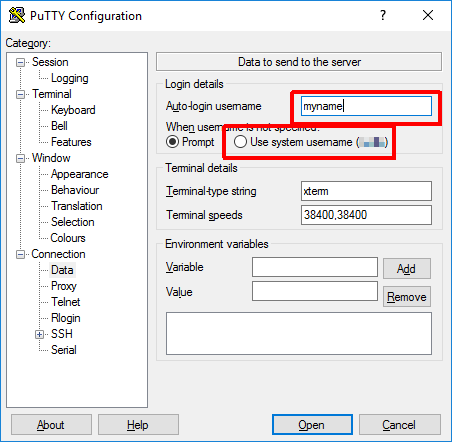
If you do not have the username set in the “Connection / Data” settings, enter it there (either set the name in the “Auto-login username” box, or click on “Use system” if the target machine login username is the same as the Windows username):
Next navigate back to the “Session” options:
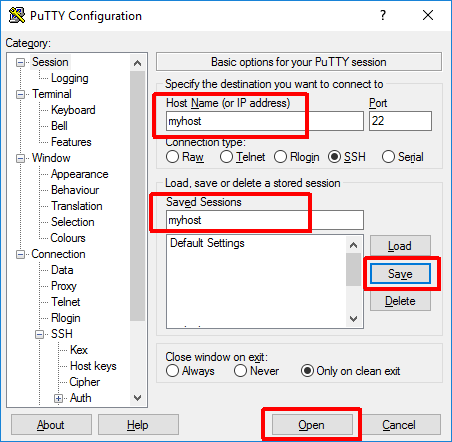
There you can setup the remote machine name and name for saving the configuration (can be the same). Make sure you “Save” the session settings, so that you don’t need to repeat the setup every time. Then you can try to “Open” the session to see if the login via SSH key works.
If the PuTTY client still asks for the password for logging in, consult the “Troubleshooting” section of the article.
(but note that if you set a password for the private key, the PuTTY will ask for that password to be able to load it)
5. Troubleshooting
5.1. Basic tools
a) SSH client verbose mode
First to try is to use the verbose output of the client by either the "-v" (verbose) or "-vv" (more verbose) parameters:
[username@client]$ ssh -vv username@remote
However, the verbose output does not help much most of the time, because you will usually see messages like this:
debug1: Next authentication method: publickey
debug1: Offering RSA public key: /home/username/.ssh/id_rsa
debug2: we sent a publickey packet, wait for reply
debug1: Authentications that can continue: publickey,gssapi-keyex,gssapi-with-mic,password
You can see, that the key was obviously not accepted, but you do not know why, as the server did not send the reason back to the client (and will never do because of the security reasons).
b) The SSH server log
Further diagnostics needs to be performed on the remote machine (SSH server). Unfortunately it usually requires administrator access, so if you are not the administrator of the remote machine nor have the sudo rights, you might be out of luck to read the appropriate logs.
The most important one is the SSH daemon (server) log file “/var/log/secure”.
If you have administrator or sudo rights, you can examine it by e.g. "less" or "tail" commands:
[username@remote]$ sudo less /var/log/secure
(you can press "Shift + F" to wait for a file change, to see messages added when trying to login)
c) The SELinux log
If the remote machine uses the **Security-Enhaced Linux (“SELinux”), it can be another reason why the SSH key login is being blocked. The SELinux is for example used by the Red Hat distributions (Fedora, Red Hat Enterprise Linux, CentOS), but many other distributions allow to install it additionally as well (Ubuntu, openSUSE etc.).
The SELinux messages can be found in the “/var/log/audit/audit.log”:
[username@remote]$ sudo less /var/log/audit/audit.log
5.2. File permissions
This is one of the common reasons, why the access via the SSH key is not allowed. The SSH server does not allow the access, if the “.ssh” folder and/or the “.ssh/authorized_keys” file on the remote server (where you are trying to connect to) are writable by other users than the owner of the account.
This commonly happens when adding the authorized key manually.
The problem demonstrates in the “/var/log/secure” file on the remote machine, where you’ll see messages like:
May 17 17:21:34 myhost sshd[4699]: Authentication refused: bad ownership or modes for directory /home/username/.ssh
You can also simply list the contents of your home folder and your “.ssh” folder by "ls -al ~/.ssh" to detect the issue.
The fix is then simple:
[username@remote]$ chmod 700 ~/.ssh
[username@remote]$ chmod 600 ~/.ssh/authorized_keys
5.3. SELinux context
If the SELinux is in place, it can also be the reason why the access is being blocked. This is generally the case, when the SELinux contexts of the “.ssh” folder and/or the “.ssh/authorized_keys” file are not correct. Similar to the “wrong permissions” above, this also commonly happens, when the SSH key is added manually (and the folder/file did not exist before thus have been created manually).
Another common reason is the user home directory in a non-default location (say e.g. if you create a service user “jenkins” with the home directory “/srv/jenkins/” instead of the default “/home/jenkins/”). Then the SELinux attributes of the manually or automatically created “.ssh” folder might not be correct.
When this happens, the “/var/log/audit/audit.log” file on the remote machine will show entries similar to:
type=AVC msg=audit(1494798023.656:822): avc:  denied  { read } for  pid=12877 comm="sshd" name="authorized_keys" dev="sdb1"
 ino=20906462 scontext=system_u:system_r:sshd_t:s0-s0:c0.c1023 tcontext=unconfined_u:object_r:var_t:s0 tclass=file
type=SYSCALL msg=audit(1494798023.656:822): arch=c000003e syscall=2 success=no _exit=-13 _a0=7fcf5392e830 a1=800 a2=1 a3=7fcf4d95c2e0
 items=0 ppid=1085 pid=12877 auid=4294967295 uid=0 gid=0 euid=996 suid=0 fsuid=996 egid=994 sgid=0 fsgid=994 tty=(none) ses=4294967295
 comm="sshd" exe="/usr/sbin/sshd" subj=system_u:system_r:sshd_t:s0-s0:c0.c1023 key=(null)
type=USER_AUTH msg=audit(1494798023.656:823): pid=12877 uid=0 auid=4294967295 ses=4294967295 subj=system_u:system_r:sshd_t:s0-s0:c0.c1023
 msg='op=pubkey acct="jenkins" exe="/usr/sbin/sshd" hostname=? addr=::1 terminal=ssh _res=failed_'
In this case, the access to the “.ssh/authorized_keys” file has been denied because the SELinux context of the file (“tcontext”) does not match the security context of the process (“scontext”).
If you do not have access to the “/var/log/audit/audit.log” file on the remote machine, you can check the SELinux context by the "ls -aZ" command:
[username@remote]$ ls -aZ ~/
drwx------. jenkins jenkins system_u:object_r:var_t:s0       .
drwxr-xr-x. root    root    system_u:object_r:var_t:s0       ..
-rw-------. jenkins jenkins unconfined_u:object_r:var_t:s0   .bash_history
-rw-r--r--. jenkins jenkins system_u:object_r:var_t:s0       .bash_logout
-rw-r--r--. jenkins jenkins system_u:object_r:var_t:s0       .bash_profile
-rw-r--r--. jenkins jenkins system_u:object_r:var_t:s0       .bashrc
drwxr-xr-x. jenkins jenkins unconfined_u:object_r:**var_t**:s0   .ssh
-rw-------. jenkins jenkins unconfined_u:object_r:var_t:s0   .viminfo
[username@remote]$ ls -aZ ~/.ssh/
drwxr-xr-x. jenkins jenkins unconfined_u:object_r:var_t:s0   .
drwx------. jenkins jenkins system_u:object_r:user_home_dir_t:s0 ..
-rw-------. jenkins jenkins unconfined_u:object_r:**var_t**:s0   authorized_keys
Here the directory and the files have a wrong SELinux type (“var_t”) instead of the correct one (“ssh_home_t”). This can be fixed by using the "semanage" and "restorecon" commands:
[username@remote]$ sudo semanage fcontext -a -t ssh_home_t "~/.ssh(/.*)?"
[username@remote]$ restorecon -R -v ~/.ssh
restorecon reset /srv/jenkins/.ssh context unconfined_u:object_r:var_t:s0->unconfined_u:object_r:ssh_home_t:s0
restorecon reset /srv/jenkins/.ssh/authorized_keys context unconfined_u:object_r:var_t:s0->unconfined_u:object_r:ssh_home_t:s0
Note that calling the "semanage" also requires the sudo access.
If you don’t have it, the alternative in such case is to use the "chcon" (“change context”) command:
[username@remote]$ chcon -R unconfined_u:object_r:ssh_home_t:s0 ~/.ssh/
5.4. SSH keys disabled
Another possible reason of the SSH key password-less authentication not working might be the SSH key authentication being disabled by the SSH daemon settings. Changing this requires the administrator/sudo access, so you cannot fix it on your own if you do not have such access on the remote machine.
This case can be detected by running the "ssh" command in the verbose mode:
[username@client]$ ssh -v username@remote
OpenSSH_6.6.1, OpenSSL 1.0.1e-fips 11 Feb 2013
debug1: Reading configuration data /etc/ssh/ssh_config
...
debug1: Authentications that can continue: gssapi-keyex,gssapi-with-mic,password
...
debug1: Next authentication method: password
In the case the public key authentication is not enabled, the “publickey” is missing in the list of available authentication methods.
The SSH daemon settings are provided by the “/etc/ssh/sshd_config” file:
[username@remote]$ sudo vim /etc/ssh/sshd_config
Find the keys “RSAAuthentication” and “PubkeyAuthentication” and make sure they are set to “yes”:
RSAAuthentication yes
PubkeyAuthentication yes
Those are normally the default values, so it should work as well if the setting is not present or commented out; however when troubleshooting, you can try to set them to “yes” explicitly. If changes were made, save and close the file and restart the SSH server (or the entire machine):
[username@remote]$ sudo systemctl restart sshd  # RHEL, Centos, Fedora
[username@remote]$ sudo service sshd restart    # Ubuntu
5.5. Restricted shells
Some shells only allow to execute very specific commands and do not allow you to use the full-fledged shell. One example of such is the Git shell, often present on the Git repository servers. As those shells do not allow you to edit the files on the remote machine, you simply cannot append the SSH key to the “.ssh/authorized_keys” file on your own and need to ask the server administrator to do it for you (if the network setup does not provide other means to add the SSH keys, e.g. via some web interface on the intranet).
5.6. Encrypted home
Note that if the remote machine user has encrypted home folder (most Linux distributions allow to choose it when creating the user, although it is not the default usually), you might not be able to use the SSH key login most of the time. It will only work in the case of the home being already decrypted (i.e. if you are already logged in some other session).
The reason for this is that unless the home folder is decrypted, the SSH daemon cannot read the “.ssh/authorized_keys” file (or any other file in the home folder for that matter). Therefore it cannot validate the SSH key login, until the user is actually logged in and the home folder is decrypted (thus it must ask for the user password first to be able to log the user in and to decrypt the home folder).


Leave a comment